

Water heaters are often ignored until they break down, leaving you with no hot water or a flooded basement. You can avoid this by knowing the signs that your water heater is on its last legs and by performing routine maintenance.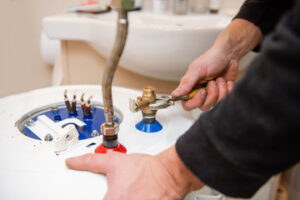
This involves draining the tank and flushing it annually. It also includes installing a new gas line and venting. Contact Hot Water Heater Replacement Denver for professional help.
A hot water heater thermostat regulates the temperature of your home’s hot water supply, ensuring consistent and reliable operation. The thermostat is a critical component that must be replaced when damaged or worn out to ensure optimal performance. If you’re a homeowner, it’s important to have the necessary skills and knowledge to safely and successfully perform this replacement project yourself.
First, locate the shut-off valve for the water tank and close it by turning it counterclockwise. Once this step is completed, you can proceed with the thermostat replacement. It’s important to ensure that the power is completely cut off from your water heater before you begin working on it, and you should use a multimeter to verify that the thermostat compartment has no electrical connection.
Using a screwdriver, remove the access panels or covers that cover the thermostat compartment on your hot water heater. Be careful not to lose or misplace these panels and covers, as they will likely need to be reattached during the replacement process. Once the panels or covers are removed, inspect the thermostat compartment for signs of damage or corrosion. Once you’re satisfied that the thermostat and its associated wiring are free from obstructions, remove the old thermostat by releasing it from its mounting bracket. If the old thermostat is still wired, carefully disconnect the wires from their terminals by loosening the screws or clips that secure them. Be careful to avoid causing unintended disconnections elsewhere in the water heater’s wiring system.
Once the wires are disconnected from the old thermostat, install the new one by screwing it onto the bracket and connecting the attached wires to their respective terminals. Be sure to match the voltage of the new thermostat to the existing wires in your hot water heater. Then, reattach the plastic shield that covers the thermostat and heating element, if applicable.
Once the new thermostat is installed, turn the power back on to your water heater by flipping the circuit breaker switch to the ON position. Test various hot water fixtures throughout your home to confirm that they’re delivering hot water at the appropriate temperature, indicating that the thermostat and heating element have been properly replaced and are functioning correctly.
Element
The element is the part that heats water, and if it burns out you won’t have hot water. It usually costs $20 to replace, and a plumber charges $150 to $200 for the job (depending on where you live and whether or not your heater is gas or electric). You can try replacing the element yourself by shutting off power to the water heater, disconnecting the wires, and then removing the cover to the wire connection box. You’ll need a pair of pliers, a screwdriver, and a continuity tester (available at most hardware stores). If you have electrical experience you can also try turning on the faucet and listening for a crackling sound. It should sound similar to what you hear when a pot of water boils on an electric stove.
A failing element is often the first sign that your hot water heater is on its last legs. You may notice that it takes longer for the water to get hot, or that your showers aren’t as long as they used to be. Sometimes repairs can fix these problems, but it’s worth considering a replacement if the water heater is too old.
If you have a gas water heater, you should pay attention to odors and discoloration in your home’s water. These can indicate a problem with the thermocouple or gas control valve. These are more expensive to repair than the pilot light, but they can cause serious injury or death if you’re not careful.
If your water heater has reached the end of its lifespan, you should consider replacing it with an Energy Star Most Efficient model. You can find these models online and at many home improvement stores. They offer savings in operating costs and energy bills, and you may qualify for a tax credit. To learn more about the best way to save money on a new water heater, visit Energy Star’s rebate finder. It’s a good idea to consult a plumber before purchasing a new unit, as they can help you decide the right type and size for your home. They can also advise you on how to choose a location for the installation and help you avoid plumbing problems in the future by installing it properly.
Dip Tube
Nothing keeps your home cleaner and more sanitary than a constant supply of hot water. When your hot water heater goes down, it can disrupt your daily life and force you to choose between taking cold showers or using hot water that is less effective. Luckily, there are many problems that impact hot water heaters and some of them are quite easy to fix.
One of the most common causes of hot water deficiency is a defective dip tube. Oftentimes, it’s easy to overlook this small component, but it plays a major role in the efficiency and hot water output of your tank. If you suspect your dip tube is faulty, or you are experiencing other issues with your water heater, you should consult a professional to assess the situation and make necessary repairs.
The purpose of the dip tube is to carry incoming cold water down to the bottom of your tank where it can be heated by a gas burner or primary electric heating element. If this tube becomes clogged or breaks, it will interfere with the heating process and reduce the amount of hot water your tank produces.
Dip tubes typically last as long as the water heater they’re attached to, but this doesn’t mean they can’t experience issues over time. Constant exposure to water erodes and eats away at the plastic that these tubes are made of. Over time, the dip tube can crumble and disintegrate into the tank, scattering tiny white pieces of plastic all over your home and creating a choppy flow of water that is not as hot or as fast as it should be.
Fortunately, a simple water heater dip tube replacement is usually all that’s needed to restore your home’s hot water supply and fix any other issues your heater may be having. To remove the old tube, first turn off all power to your heater by turning the breaker in your circuit box for an electric heater or opening the bleeder valve at the top of the tank for a gas heater. Then, you can disconnect the nipple and connector for the cold water pipe on the top of the tank and unscrew the dip tube.
Pressure Valve
This is an important safety device that lets water out when the pressure gets too high inside the tank. It prevents the temperature and pressure from getting out of control, protecting you and your family from a possible disaster like a ruptured tank or even a fire.
If it isn’t working properly, it could leak or burst and send scalding water shooting through your home. You can open the valve manually to test it, but if you need to replace it, Reactive Plumbing recommends a professional do it.
Before you begin, shut off the gas or switch off the electricity to your hot water heater. You should also disconnect the discharge pipe from the T&P valve. Connect a garden hose to the drain valve on the bottom of the tank and lead it outside or into a bucket. You may need to fill the bucket often so you can drain it quickly. Once the water level is below the T&P valve, you can unscrew it. If you’re careful, you can remove it without letting any water shoot out.
Once you’ve removed the old T&P valve, shut off the water supply to the tank and open the cold-water shutoff at your house. Put a bucket under the discharge pipe, and lift the metal lever on the T&P valve. Then close the valve when water begins flowing out. It should only flow for a few minutes, so be ready to catch it in time.
Screw the new T&P valve into place, making sure to use pipe thread tape on it and to screw it in clockwise. It’s a good idea to tighten it with a wrench, but don’t over-tighten it. Reattach the discharge pipe, ensuring that the opening of the pipe is oriented downward (not up) so it can’t get capped. Now you can turn on the hot water at a faucet in your house to check for leaks.