
A sturdy faucet is a must for any modern kitchen. Faucets made with internal solid materials like brass stand up to day-to-day use better than flimsy products.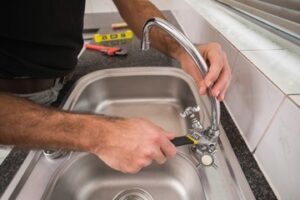
Shut off water supply and remove handle(s). Pop off decorative cap, if present, to expose screw beneath. If the screw is seized, apply penetrating oil to loosen it. Visit Website to learn more.
An o-ring is a tiny disk made of rubber that sits in a groove to form a seal. O-rings are used in a wide variety of liquid and gas sealing applications. The o-rings in your faucet can become loose or worn out, causing the spout to leak. Thankfully, replacing o-rings is a relatively easy and inexpensive fix. The key to success is using the right lubricant and following proper installation techniques.
A leaking faucet is typically caused by one of three issues: a damaged or corroded valve seat, a loose washer, or worn inlet and outlet seals in cartridge faucets. Replacing a valve seat is more difficult than replacing an o-ring, and typically requires the services of a plumbing professional. A corroded valve seat may be caused by hard water that contains extra minerals, or by the normal wear and tear of the mechanism.
To repair a leaky faucet, you first need to turn off the water valves under the sink and allow the pipes to drain. Next, remove the hot-water and cold-water indicator caps from the faucet handles to expose the water connections. Carefully pry off the handles and unscrew the screws underneath to remove them. Each handle has a metal barrel that holds the water connections. These barrels connect to the valve stem and cartridge through a retainer clip that can be removed with pliers.
Once the faucet is disassembled, locate the o-rings and remove them. Replace the old o-rings with new ones of the same size. Make sure to use o-rings that are approved for faucet use, which you can find at many hardware stores and home centers.
O-ring damage can be caused by improper assembly, incorrect mounting, chemical exposure, thermal expansion/contraction, or ageing and ozone. To prevent damage, select the correct o-ring for your application and follow the manufacturer’s installation instructions. The O-ring’s elastomer material determines its resistance to chemical exposure, temperature and vibration. O-rings for passenger cars, heavy trucks and aerospace applications require a high-performance elastomer. Silicone o-rings are popular for medical devices and pharmaceutical equipment because they can withstand aggressive cleaning and sterilization procedures.
Valve Seat
Valve seats are the contact point between the faucet cartridge and spout, and they’re responsible for a watertight seal that prevents leaks. The valve seat can wear out due to normal usage, sediment accumulation, high water pressure or even corrosion from hard water. If the valve seat no longer creates a tight seal, the washer and valve stem will have to move more to open or close the faucet. This creates friction and wear, causing the parts to lose their fit and resulting in leaks.
Other causes of leaking faucets include worn O-rings, which are rubber rings that hold the valve stem in place; valve seat corrosion, which disrupts the seal between the valve seat and the washer; and broken hardware, such as the valve handle or spout cap. These problems can be difficult to fix, but if the faucet spout is consistently leaking or there’s water running around the base of the handle, it’s time to call a plumber for help.
Before you start removing any parts of the faucet, it’s important to turn off the water supply valves at the house. There should be two valves (one for hot and one for cold) under the sink, and you can typically find them behind or underneath the cabinet where your plumbing runs to the faucet.
Once the water is turned off, you can remove the handles and spout from your faucet to begin inspecting the problem. The most common cause of a leaking faucet is a worn valve seat. The valve seat can wear out due to regular use, mineral deposits or even corrosion from hard water. The seat can also become corroded from hard water, which is often the result of a clogged water filter.
If the valve seat is worn out or damaged, you can replace it with a new one. This is a fairly in-depth job that requires specialized tools, including a valve seat wrench and a valve seat grinder or dresser. A seat grinder or dresser is used to reshape the valve seat and prevent it from wearing out, and you can purchase one at most hardware stores.
Washers
Washers are a vital component of faucets, creating a water seal. They are located underneath a decorative cap that snaps or unscrews, usually on the center of the handle. These caps are often made of brass, which is resistant to corrosion and helps the washers create a strong seal. If you notice a leak around the faucet handle, it may be time to replace the washer. Washers are also prone to wear and tear due to the constant pressure they must endure, so they should be cleaned regularly to prevent a build-up of sediment that can result in corrosion and leaks.
Before replacing the washer, check that it matches the size of the old one in terms of diameter and thickness. Once you have the correct size, reinstall it and ensure it is aligned correctly with any grooves or ridges on the stem. You should also use a little bit of plumber’s grease or silicone-based lubricant to help the washer move smoothly and maintain a strong seal.
There are several types of washers, including flanged, tapered, and flat. The type you choose depends on the material, size, and compatibility with your faucet. Some common materials for washers include rubber, silicone, and ceramic disc cartridges. Rubber washers are known for their durability and heat resistance, while silicone washers are ideal for high-temperature applications. A ceramic disc cartridge serves a similar purpose, but has the added benefit of being more durable and resisting corrosion.
To properly install a new washer, make sure the shutoff valves are closed before beginning. You will also need a few other tools, such as an adjustable wrench and screwdrivers (depending on the model of your faucet). Finally, you should have a roll of plumber’s tape or Teflon tape, which is used to wrap threaded connections and prevent leaks.
This 58-pack assortment of flat and beveled washers is a convenient solution for quick fixes to leaky faucets. It comes with a variety of sizes to suit most fixtures, and includes brass screws that protect against corrosion. Its affordable price and durable rubber construction make it a reliable option for those who want to avoid costly repairs.
Cartridge
A cartridge is the heart of any faucet and has a big job: it controls both the flow and temperature of water from a tap. Over time, this little component can get clogged with mineral buildup and other debris. This can make it difficult to turn the handle or lead to leaking. Cleaning and lubricating the cartridge can help prevent these problems.
A number of different types of cartridges can be found in faucets, with the most traditional being a compression cartridge. This design consists of a brass stem that compresses a washer against a valve seat to control water flow and temperature. These are durable, but they can wear out and require regular maintenance. Other types of cartridges include ceramic disc cartridges, which are common in modern faucets because they are durable and resistant to wear. These can also be susceptible to hard water deposits, which can make them less effective.
Cartridges may also suffer from other issues, such as improper installation or damaged components. These issues can cause leaks, which is why it’s important to take the time to inspect and repair any other parts of a faucet before replacing the cartridge.
The most common issue with a cartridge is wear and tear. Over time, this can lead to a loss of functionality and a buildup of mineral deposits that can restrict water flow or cause the faucet to leak. Regular cleaning and lubrication can help extend its lifespan.
In some cases, replacing the cartridge is necessary to restore functionality and ensure that water is clean and safe for use. Replacing a faucet cartridge can be a simple DIY project, but it’s important to shut off the water supply before beginning and to follow the manufacturer’s instructions for proper installation.
Depending on the type of faucet, it may be necessary to remove decorative caps or a retaining nut to access the cartridge. To do this, shut off the water supply, then remove the handle. After that, remove the cap or screw to access the sleeve that contains the cartridge. Once the sleeve is removed, the cartridge can be cleaned or soaked in a vinegar solution to remove hard water deposits. Once the cartridge is clean and lubricated, it can be replaced and the faucet should work properly.