landscape lighting
Landscaping

Landscape Lighting Repair

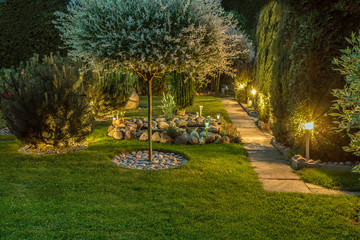
Landscape lighting fixtures are exposed to a lot of harsh weather. It’s essential to check them out regularly for signs of wear and tear. landscape lighting

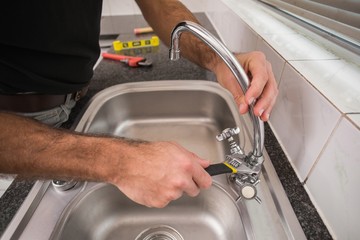
This easy DIY project can be done in a few hours. You’ll need a voltmeter, wire nut connectors, and pliers. First, make sure the transformer is plugged in and that it has the correct voltage. For professional help, contact Landscape Lighting Repair Orlando now!

Landscape lighting is a fantastic way to accentuate the beauty of your property at night. However, like any system it requires some maintenance and repairs to ensure it functions as intended. Oftentimes these repairs can be done yourself without the need to call in a professional, but some may require the assistance of an outdoor lighting specialist.

The most common landscape lighting repair is changing a light bulb. This can be done in a few simple steps, turning off the power to the fixture, removing the old bulb and replacing with a new one. It is recommended that you use a bulb that is rated for outdoor lighting, as these bulbs will last longer and will not burn out as quickly.

Changing a light bulb is the most important thing you can do to keep your landscape lights functioning correctly. You can find the appropriate replacement bulb by consulting your light fixture manual or checking the online catalogues for a specific fixture. A quick search will provide you with a list of available options and their specifications, including Kelvin temperature, lumen output, and beam spread/angle.

Other issues that may arise with fixtures include:

  1. Cleaning the glass. One of the best ways to keep your landscape lights looking their best is to clean the glass lenses on a regular basis. Using a soft rag and soapy water is typically sufficient, though some vendors recommend the use of a non-toxic glass cleaner such as CLR or Brillo.
  2. Verifying the timer or photocell settings. If your landscape lighting system is equipped with a timer or photocell, it is important to check that the settings are correct and that they are running at the proper times of day and night.
  3. Checking for corroded wires or connections. These can be caused by a number of things, such as a faulty ground stake, poor installation, or simply age. Checking for rust or corrosion at the connector points, as well as testing them with a digital voltage meter to make sure they are getting the proper amount of voltage, can help determine what the problem is.

Wires

The wires that power landscape lighting are often overlooked and can be a cause of outages. These wires run from the transformer to the light fixtures and are usually buried underground in the case of a direct burial system. These wires are prone to shorts due to abrasion or corrosion. This can happen if the system is improperly installed, the wiring has been exposed to moisture, or if splices aren’t properly sealed.

To prevent these shorts, you should examine your landscape lighting wires and make sure they are intact. You should feel along the length of the cord to see if it feels warm or if there are any broken spots. If you find any, you can repair them using a simple tool. First, get some heat-shrink tubing, like you would find at an electronics or craft supply store. Then, cut a 3’ length of the tubing and slip it over the plug, a little bit beyond the plastic body of the plug. Next, slide the tubing a little further and use a lighter to shrink it around the damaged part of the wire. This will seal the abrasion and protect it from further damage.

Lastly, you should also inspect the connections of your wires for signs of corrosion. If you see any, you can clean them with an emery board or sandpaper and spray with contact cleaner to help prevent future problems.

Another common issue that may be causing your lights to go out is if they are not getting enough voltage from the transformer. To check this, you can use a voltage meter to determine if your wires are getting enough power or not.

Finally, you should perform regular cleaning and maintenance tasks to keep your landscape lights in good condition. This includes trimming back plants and shrubs that are overgrown or touching your light fixtures. This will improve illumination, prolong the life of your lighting and help avoid more expensive repairs down the road. For more information on cleaning and maintenance for your outdoor lighting system, consult the manufacturer’s website or your landscape lighting installer.

Light Bulbs

Getting the right light bulbs for your landscape lighting fixtures is a must. They need to be the correct size and color (Kelvin) or they will not produce a good light. To do this you need to use a multi-meter to find out what the voltage is at the bulb mount. You also need to determine if the bulbs are being supplied with AC or DC. Typically, LED bulbs will only work with DC and not AC.

After you have figured this out you need to carefully remove the existing lights from the fixture by unscrewing them and pulling them out. It is important to do this carefully so that you don’t damage the wire connections or the plug that goes into the ground stake. You will probably need to dig or pry a little dirt out from the bottom of the stake so that you can get your tool under it and lift it up.

Once you have the new light bulbs it is time to put them in the fixture. You will need to look for corrosion on the socket’s metal components, which can be a problem for landscape lighting fixtures. A corroded socket will not make good contact with the bulb and won’t provide the proper amount of power to the bulb.

Another thing that can cause a light to burn out prematurely is oil on the glass. It is important to clean the glass of any oil so that there will be no problem with the arc produced by the filament. It is also a good idea to wipe down the glass with a wet cloth every once in awhile so that it stays clean.

It is also a good idea to check the color temperature of the new bulbs before installing them. Many people are surprised to learn that they can find a wide range of light bulbs with different colors and Kelvin ratings. If you have a lot of bulbs that are a different color temperature it can cause a mismatch between the light colors in the yard and the indoor lighting.

Timer

It is important to have proper landscape lighting maintenance to ensure the health and longevity of your system. Proper care can help avoid expensive repairs or replacements.

Most landscape lighting systems come with a timer that allows you to control when your lights turn on and off each night. However, over time your timer may stop working or not function properly. There are several things you can try to troubleshoot and fix the problem on your own.

  1. First, confirm that your transformer has power. This can be done by using a voltmeter or plugging a device into the receptacle of your transformer. If the voltmeter reads zero or no voltage then your transformer has lost its power and you will need to replace it.
  2. Check that the timer is set to a current time of day. This can also be done by using a voltmeter on the receptacle of your transformer or checking the current time of day at your home. If the timer is set to a different time of day than your desired lighting schedule then you will need to manually change the settings on your timer.
  3. Look at the green and red pins on your timer to make sure they are in the correct AM and PM slots. You should only have one green and one red pin unless you are running multiple programs at the same time.
  4. WD-40 is great for getting old mechanical timers working again. Just be careful not to get any on your electrical components as it can wash them out and cause issues down the line.
  5. Finally, it is a good idea to replace your blown bulbs on a regular basis to ensure you have enough light for the proper amount of coverage and to prevent any further damage. It is recommended to use a high-quality halogen bulb for outdoor landscape lighting as they will last longer than standard incandescent bulbs.

Landscape lighting can be a beautiful accent to your home and garden. It can also be a headache when it doesn’t work as expected. By following the tips above and using a little detective work you can usually find the source of your problem and solve it yourself in just a few steps. If you are still having problems after trying these tips it is time to call a professional.

Replacement Windows
Home Improvement

How Replacement Windows Can Improve Your Home

When improving your home’s aesthetic and energy efficiency, the windows you choose make all the difference.Replacement Windows

Choosing the right style and quality of the window is critical, but so is proper installation. By conducting thorough research and selecting a skilled contractor, you can ensure that your investment in Replacement Windows delivers on its promised benefits. Visit Website to learn more.

Energy efficient replacement windows help you save money on your utility bills. They also help offset your carbon footprint by reducing greenhouse gas emissions.

New windows create a tight seal and use insulated frames to minimize heat transfer which reduces cold drafts. Additionally, double- or triple-pane glass offers superior insulating properties. These energy efficient features can drastically lower your heating and cooling costs.

The exact amount of savings you can expect to see from your new energy-efficient replacement windows will depend on your location and the type of window you choose. According to the EPA, replacing single-pane windows with ENERGY STAR models could save homeowners about $366 per year in heating and cooling costs.

You can also increase your home’s insulating power by choosing a window with between-the-glass blinds or shades that provide additional insulating value while letting in light. New windows with enhanced safety options, including fire sensors and handles, can also help to protect your family from a house fire.

Many replacement windows come with a variety of operational styles, frame types and colors that can complement your existing decor and enhance your home’s aesthetic. Additionally, many types of replacement windows are designed to be installed within the existing window frame and exterior cladding without requiring major alterations to your home’s walls or drywall.

This can be a big benefit for homeowners with historic homes or those who have carefully curated their home’s style. It’s also a great option for older homes that have historically accurate trim and siding, making it easy to maintain their look and feel while adding the benefits of newer technology. In addition, replacement windows that can be purchased for a reasonable price are very appealing to potential buyers looking for ways to improve the functionality and efficiency of their current homes.

Better Aesthetics

When your old windows are replaced by newer models, you’ll see a noticeable difference in the aesthetic of your home. They will be double- or triple-paned with high levels of insulation. These features will help protect your home from the elements and amplify natural light throughout. This has been shown to improve mood and productivity while also reducing the need for artificial lighting during the day.

Replacement windows can be installed in a few different ways, including insert window replacement and full frame replacement. During the installation process, the original sash and trim are removed. However, the exterior cladding and casing will remain in place.

The insert window installation is the easiest of the two options to complete and is ideal for homes that are being remodeled and want to keep their existing siding, trim, and capping. It is also a good choice for new construction projects where the windows will be installed in a brand-new frame.

In addition to enhancing the curb appeal of your Sarasota home, today’s windows are designed for low maintenance. Convenient features like between-the-glass blinds and sashes that tilt in make cleaning much easier than ever before.

Window frames come in a variety of shapes, sizes, styles, and colors. They can also be customized with upgrades like grids and decorative glass to suit your tastes. With so many choices on the market, you’re sure to find a window that perfectly complements your home. In fact, one of the main reasons that homeowners choose to replace their windows is because they want to upgrade the aesthetic of their home. Newer windows will be more energy efficient, provide better security, and offer a more modern look.

Better Noise Reduction

Noise pollution is a real problem for many homeowners. Whether it’s neighbors practicing electric guitar, the drone of nearby highway traffic, or the barking of neighboring dogs, too much ambient sound can make it hard to relax and unwind. In some cases, this can lead to stress levels and a lack of sleep, which in turn can impact your quality of life.

Luckily, modern replacement windows are equipped with noise-reducing features that help to reduce the amount of noise that penetrates your home. You can upgrade your single-pane windows to insulated double-pane windows, or go even further by installing triple-pane windows. The extra layers of insulation dampen and disperse sound waves, significantly lowering the volume of ambient noises in your home.

When comparing the effectiveness of different types of windows, you should look at their Sound Transmission Class (STC) rating. The higher the STC rating, the better the window is at reducing outside noise.

The STC of a window is calculated by measuring how quickly and easily sound travels through the glass and into a house. Typically, older single-pane windows have a lower STC rating than newer double-pane windows. However, you can improve your STC rating by upgrading to windows with thicker glass or a strategy like pairing panes of different thicknesses (an STC upgrade).

If your windows are old, upgrading them to double-pane windows will make a significant difference in the amount of noise that can enter your home. Adding triple-pane windows will increase this benefit even more, but it can add a substantial price tag to your project. Your window installer will be able to advise you on the best options for your specific project and budget.

Home Value Increase

If you plan to sell your home in the future, installing replacement windows can help you maximize your resale value. As long as you make wise choices in both the materials and the company that you work with, new windows can offer a good return on investment.

Potential buyers can expect to pay a premium for a home with energy efficient windows that are also easy on the eyes. This is especially true if the windows are double-pane and provide noise reduction.

Besides the energy efficiency and curb appeal that new windows can bring, they can also be a great way to add security to your home. Old windows that don’t close properly or lock can allow criminals to enter the home. Replacement windows with better locks, stronger frames, and glass can help keep your home more secure.

Another way that replacement windows can help increase your resale value is by giving your home a more modern look. Window frames and operational styles are now available in many different designs to suit any style. This makes it easier to find the perfect windows that will complement your home.

You’ll be able to choose from a variety of colors, materials and finishes to help you create the exact look you want for your home. Additionally, there are a number of styles that are compatible with any budget. If you’re looking to save, then consider composite or vinyl frames that are less expensive than wood.

Although installing new windows may seem like a big undertaking, it’s one of the best home improvement projects you can undertake. The resale value and increased energy efficiency will give you a good return on your investment.

More Comfort

When old windows are leaking air, creating drafts, or letting harmful ultraviolet rays into the home, they’re less than comfortable. But replacement windows provide a more hospitable environment, thanks to new energy-efficient options that reduce the need for heating and cooling systems to work harder. This not only helps lower utility bills, but also makes the house more livable and increases comfort for residents.

In addition, new replacement windows often seal better and prevent moisture from accumulating, which can help avoid mold growth on the window sills and other surfaces. This can greatly improve health for anyone suffering from allergies or other respiratory conditions.

Many replacement window options are designed to be easier to open, close, and clean than older ones. Double-hung windows, for example, feature a lower sash that slides upward, making it easy to open for ventilation without needing to step outside or use a ladder. This design makes cleaning the windows a breeze and helps to keep the interior of the house cool during summer heat waves.

New replacement windows are often designed with improved security features as well, helping to protect the home from intruders. This is especially important if the original windows are difficult to open from the inside and/or have single panes of glass. New replacement windows offer a variety of locking mechanisms, including casement and awning windows that are narrow enough to be difficult for an intruder to break through.

Many replacement windows are also designed to be more soundproof, allowing homeowners to enjoy peace and quiet away from the sounds of traffic on busy streets or noisy neighbors. This can make a big difference in how a homeowner or apartment resident feels about living in the building, and can boost a property’s market value when it comes time to sell.

Epoxy Flooring
Home Improvement

Why Choose Epoxy Flooring?

Epoxy is a popular choice for commercial and industrial floor coatings. Its durability and customizability make it a great value.Epoxy Flooring

Unlike concrete, epoxy is impervious to most chemicals. This means spills, stains, and drips won’t damage your floors. Contact Top Coat Technicians for professional help.

Be sure to buy a real two-part industrial epoxy with at least 50% solids. Water-based epoxies are cheaper, but they wear right through over time.

Epoxy floors are very durable and can take a lot of wear and tear. They also have good chemical resistance, which makes them a good choice for garages, commercial spaces, industrial environments and living areas. These floors are also easy to clean and require less maintenance than many other flooring types.

Generally, an epoxy floor should be cleaned regularly using a mop and warm water. The best mop to use is a micro fiber mop, as it will give the floor a deeper clean. These mops can be found at home improvement stores and are quite affordable. They are much more effective than a standard cotton mop, as they pick up fine particles of dirt.

If a liquid spills on an epoxy floor, it is important to clean it up as soon as possible. This will prevent the chemicals from seeping into the concrete and creating a dangerous mess. Oils and other chemicals, such as brake fluid, gasoline and antifreeze, can damage epoxy flooring if they are allowed to sit for long periods of time.

Epoxy coatings are also resistant to staining, which is another benefit. If a chemical like rust or paint is accidentally spilled on an epoxy floor, it can usually be removed by using warm water and a kitchen scrubbing sponge or pad. Avoid steel wool and harsh scrubbing chemicals, as these can damage the floor coating.

In addition to regular cleaning, epoxy floors should be checked for cracks and chips. These should be repaired as soon as possible. A walk-off mat should be placed at the entrance of the garage or work area to prevent dirt and sand from being tracked onto the epoxy flooring. Additionally, it is important to place protective pads under machinery and tools to avoid damaging the surface of the floor.

While epoxy flooring is very durable, it can still be scratched and damaged by heavy equipment or sharp objects. In some cases, these scratches and gouges may even penetrate the floor and cause damage to the concrete underneath. Therefore, it is important to prevent these damages from occurring by placing protective coverings under equipment and using plywood when moving large pieces of machinery or furniture over the floor.

Durable

Epoxy is one of the most durable floor coatings available. It can withstand heavy loads and even impact damage. This makes it a popular choice for commercial and industrial spaces. It creates an impenetrable seal that is also waterproof, so it is a great option for areas that will encounter spills or flooding. It is particularly helpful in places that will see chemical and oil spills as these toxins are unable to absorb into the floor.

It is important to note that the durability of an epoxy floor will greatly depend on how it is cared for. A quick daily sweep and a deep clean every week or two will help it to last a long time. This is also true for commercial floors that will see a lot of foot traffic.

Another factor that will influence the longevity of an epoxy floor is the condition of the concrete slab it is installed over. If the concrete is cracked, pitted, oil stained or has a moisture problem it will not bond well with the epoxy. A quality epoxy floor is able to handle some damage to the substrate, but if the surface is too rough or has large cracks it will not hold up well under pressure.

Typically, it is best to install an epoxy floor over a slab that has a minimum strength of 3000 psi. The type of epoxy you choose will also make a difference in how durable it is. A solvent-based epoxy will last longer than a water-based one. For maximum durability, it is a good idea to go with a two-part epoxy solution that is 100 percent solids.

The durability of your epoxy floor will also be affected by how you prepare the surface before applying it. Much like building a house, you can have the best roof and windows available, but if you start with a faulty foundation it will not stand up to the test of time.

A professional will know how to properly prep the surface for an epoxy floor. This will involve removing any loose debris, priming and etching the surface and ensuring that the concrete base is dry. Any moisture in the slab will cause an adhesion failure and will ultimately lead to an epoxy failure.

Aesthetically Pleasing

Epoxy flooring is a great way to enhance your space with its beautiful design and colour options. You can choose a color that will match your décor or fit in with the theme of your home or business. The floor’s shine also reflects light and makes your space look larger. This will brighten up your space, making it more inviting and welcoming to visitors or customers.

Epoxy is non-porous, so it can be used in areas that may be susceptible to oil or chemical spills. The epoxy coating will prevent these substances from seeping into the concrete and damaging it, so you won’t have to worry about replacing your flooring if there is an accidental spillage. This is especially helpful in commercial spaces where you may have to deal with toxins on a regular basis.

Another advantage of epoxy is that it’s a safe, non-toxic material that doesn’t contain any hazardous chemicals or solvents. While liquid epoxy can be harmful if ingested or come into contact with your skin, it becomes completely safe when it dries and hardens. This is particularly important if you’re using epoxy in areas that are exposed to a lot of foot traffic, as it will reduce the risk of accidental slips and falls.

When you decide to have epoxy floors installed in your home or business, you’ll have a wide variety of styles and colours to choose from. There are even floor designs that mimic the luxurious appearance of marble, wood, and granite for a more elegant look. The vast array of possibilities and unique design options make epoxy flooring a highly sought-after and desirable flooring solution for both residential and commercial spaces.

You can even request anti-slip additives for safety purposes. Sand, gravel, polymer grit, or aluminum oxide can be mixed in with the epoxy for an added layer of grip that will protect against accidental falls. This is a particularly useful feature in busy studios or commercial spaces where heavy equipment is often being used.

If you’re thinking about installing an epoxy floor in your home or business, it’s recommended to hire a professional contractor for the job. They will ensure that the installation process is fast, easy, and done correctly. This will save you a lot of time, stress, and money in the long run. A professional contractor will use high-quality materials and provide expert workmanship that will guarantee a perfectly-applied epoxy flooring.

Low Maintenance

If you’re looking for a low maintenance flooring solution that will stand the test of time, epoxy floors are a great choice. They can be applied directly over your existing concrete floor, and they’re highly customizable. This allows you to easily create a design scheme that matches your home or business. The durable surface is also resistant to impact, slippages, high temperatures, and fire. This makes it ideal for areas where vehicles and equipment are regularly moved or parked.

In addition, epoxy floors are resistant to chemical spills and stains. This is because the coating is non-porous, so it can withstand splashes of oil or other chemicals without staining or corroding. This means you can keep your garage or workshop a workable space even after you’ve cleaned up any chemicals you may have used.

Another benefit of epoxy floors is that they’re easy to maintain. You can sweep or vacuum them on a regular basis to remove dirt and grit, which can scratch or damage other types of flooring. It’s important to do this regularly to keep your flooring in good condition and to protect it from wear and tear.

Epoxy is also heat-resistant, so it can withstand the hot wheels of your car or the high temperatures of a workshop. It’s also available in a range of colours and textures, so you can easily create designated zones for specific activities. This is especially useful in large facilities where loading bays, forklift paths and walkways need to be clearly marked.

If you’re thinking about revamping your flooring with epoxy, it’s worth contacting a professional. They can advise you on the best type of epoxy for your needs and help you choose a colour that will complement your space. They can also give you a quote and timeline for the job, so you can plan your renovations accordingly.

Epoxy flooring is a popular option for a variety of environments, including commercial, automotive, industrial and residential settings. Its durability and versatility make it a popular choice for both homeowners and businesses, and its low maintenance costs mean it’s an affordable way to give your space a fresh new look.

Faucet Repair
Plumbing

How to Properly Perform Faucet Repair

A sturdy faucet is a must for any modern kitchen. Faucets made with internal solid materials like brass stand up to day-to-day use better than flimsy products.Faucet Repair

Shut off water supply and remove handle(s). Pop off decorative cap, if present, to expose screw beneath. If the screw is seized, apply penetrating oil to loosen it. Visit Website to learn more. 

An o-ring is a tiny disk made of rubber that sits in a groove to form a seal. O-rings are used in a wide variety of liquid and gas sealing applications. The o-rings in your faucet can become loose or worn out, causing the spout to leak. Thankfully, replacing o-rings is a relatively easy and inexpensive fix. The key to success is using the right lubricant and following proper installation techniques.

A leaking faucet is typically caused by one of three issues: a damaged or corroded valve seat, a loose washer, or worn inlet and outlet seals in cartridge faucets. Replacing a valve seat is more difficult than replacing an o-ring, and typically requires the services of a plumbing professional. A corroded valve seat may be caused by hard water that contains extra minerals, or by the normal wear and tear of the mechanism.

To repair a leaky faucet, you first need to turn off the water valves under the sink and allow the pipes to drain. Next, remove the hot-water and cold-water indicator caps from the faucet handles to expose the water connections. Carefully pry off the handles and unscrew the screws underneath to remove them. Each handle has a metal barrel that holds the water connections. These barrels connect to the valve stem and cartridge through a retainer clip that can be removed with pliers.

Once the faucet is disassembled, locate the o-rings and remove them. Replace the old o-rings with new ones of the same size. Make sure to use o-rings that are approved for faucet use, which you can find at many hardware stores and home centers.

O-ring damage can be caused by improper assembly, incorrect mounting, chemical exposure, thermal expansion/contraction, or ageing and ozone. To prevent damage, select the correct o-ring for your application and follow the manufacturer’s installation instructions. The O-ring’s elastomer material determines its resistance to chemical exposure, temperature and vibration. O-rings for passenger cars, heavy trucks and aerospace applications require a high-performance elastomer. Silicone o-rings are popular for medical devices and pharmaceutical equipment because they can withstand aggressive cleaning and sterilization procedures.

Valve Seat

Valve seats are the contact point between the faucet cartridge and spout, and they’re responsible for a watertight seal that prevents leaks. The valve seat can wear out due to normal usage, sediment accumulation, high water pressure or even corrosion from hard water. If the valve seat no longer creates a tight seal, the washer and valve stem will have to move more to open or close the faucet. This creates friction and wear, causing the parts to lose their fit and resulting in leaks.

Other causes of leaking faucets include worn O-rings, which are rubber rings that hold the valve stem in place; valve seat corrosion, which disrupts the seal between the valve seat and the washer; and broken hardware, such as the valve handle or spout cap. These problems can be difficult to fix, but if the faucet spout is consistently leaking or there’s water running around the base of the handle, it’s time to call a plumber for help.

Before you start removing any parts of the faucet, it’s important to turn off the water supply valves at the house. There should be two valves (one for hot and one for cold) under the sink, and you can typically find them behind or underneath the cabinet where your plumbing runs to the faucet.

Once the water is turned off, you can remove the handles and spout from your faucet to begin inspecting the problem. The most common cause of a leaking faucet is a worn valve seat. The valve seat can wear out due to regular use, mineral deposits or even corrosion from hard water. The seat can also become corroded from hard water, which is often the result of a clogged water filter.

If the valve seat is worn out or damaged, you can replace it with a new one. This is a fairly in-depth job that requires specialized tools, including a valve seat wrench and a valve seat grinder or dresser. A seat grinder or dresser is used to reshape the valve seat and prevent it from wearing out, and you can purchase one at most hardware stores.

Washers

Washers are a vital component of faucets, creating a water seal. They are located underneath a decorative cap that snaps or unscrews, usually on the center of the handle. These caps are often made of brass, which is resistant to corrosion and helps the washers create a strong seal. If you notice a leak around the faucet handle, it may be time to replace the washer. Washers are also prone to wear and tear due to the constant pressure they must endure, so they should be cleaned regularly to prevent a build-up of sediment that can result in corrosion and leaks.

Before replacing the washer, check that it matches the size of the old one in terms of diameter and thickness. Once you have the correct size, reinstall it and ensure it is aligned correctly with any grooves or ridges on the stem. You should also use a little bit of plumber’s grease or silicone-based lubricant to help the washer move smoothly and maintain a strong seal.

There are several types of washers, including flanged, tapered, and flat. The type you choose depends on the material, size, and compatibility with your faucet. Some common materials for washers include rubber, silicone, and ceramic disc cartridges. Rubber washers are known for their durability and heat resistance, while silicone washers are ideal for high-temperature applications. A ceramic disc cartridge serves a similar purpose, but has the added benefit of being more durable and resisting corrosion.

To properly install a new washer, make sure the shutoff valves are closed before beginning. You will also need a few other tools, such as an adjustable wrench and screwdrivers (depending on the model of your faucet). Finally, you should have a roll of plumber’s tape or Teflon tape, which is used to wrap threaded connections and prevent leaks.

This 58-pack assortment of flat and beveled washers is a convenient solution for quick fixes to leaky faucets. It comes with a variety of sizes to suit most fixtures, and includes brass screws that protect against corrosion. Its affordable price and durable rubber construction make it a reliable option for those who want to avoid costly repairs.

Cartridge

A cartridge is the heart of any faucet and has a big job: it controls both the flow and temperature of water from a tap. Over time, this little component can get clogged with mineral buildup and other debris. This can make it difficult to turn the handle or lead to leaking. Cleaning and lubricating the cartridge can help prevent these problems.

A number of different types of cartridges can be found in faucets, with the most traditional being a compression cartridge. This design consists of a brass stem that compresses a washer against a valve seat to control water flow and temperature. These are durable, but they can wear out and require regular maintenance. Other types of cartridges include ceramic disc cartridges, which are common in modern faucets because they are durable and resistant to wear. These can also be susceptible to hard water deposits, which can make them less effective.

Cartridges may also suffer from other issues, such as improper installation or damaged components. These issues can cause leaks, which is why it’s important to take the time to inspect and repair any other parts of a faucet before replacing the cartridge.

The most common issue with a cartridge is wear and tear. Over time, this can lead to a loss of functionality and a buildup of mineral deposits that can restrict water flow or cause the faucet to leak. Regular cleaning and lubrication can help extend its lifespan.

In some cases, replacing the cartridge is necessary to restore functionality and ensure that water is clean and safe for use. Replacing a faucet cartridge can be a simple DIY project, but it’s important to shut off the water supply before beginning and to follow the manufacturer’s instructions for proper installation.

Depending on the type of faucet, it may be necessary to remove decorative caps or a retaining nut to access the cartridge. To do this, shut off the water supply, then remove the handle. After that, remove the cap or screw to access the sleeve that contains the cartridge. Once the sleeve is removed, the cartridge can be cleaned or soaked in a vinegar solution to remove hard water deposits. Once the cartridge is clean and lubricated, it can be replaced and the faucet should work properly.

Business Services

Hormone Therapy

Hormone therapy uses drugs to add, block or remove hormones. It is also called endocrine therapy. For more information, click the link https://houseofaesthetix.com/ provided to proceed.

It may help prevent cancer from growing and spreading. Doctors use it to treat certain types of prostate and breast cancer. It is usually given along with other treatments.

Hormone Therapy for Breast Cancer - Texas Health Care Obstetrics &  Gynecology

The type and dose of hormones used depends on your health and risk. You can receive hormone therapy at home or in a hospital or clinic.

Hormone therapy is treatment that adds, blocks or removes hormones. It is also called anti-hormonal therapy or endocrine therapy. Some types of cancer use the body’s natural hormones to fuel their growth. Hormone therapy reduces or blocks these hormones to stop the cancer from growing or spreading.

Hormones are chemical messengers that control how certain cells and organs function and grow. There are many different kinds of hormones in the body, including estrogen and progesterone, which help with menstruation, reproduction and the immune system. Hormones travel through the blood to affect other cells and tissues. Cancerous cells need the hormones estrogen and progesterone to grow and spread. Cancer treatments like surgery, chemotherapy and radiation therapy block hormones to prevent them from fueling cancerous cells. Hormone therapy can be used with these therapies or on its own.

The type of hormone therapy you get depends on the type of cancer you have and your symptoms. Your healthcare team will discuss this with you during an office visit specifically dedicated to deciding whether or not HT is right for you.

For breast cancer, a hormone called estrogen can stimulate the growth of tumors that have receptors on their surface. About 8 out of 10 breast cancers are estrogen receptor positive (ER-positive). Healthcare providers use hormone therapy to lower or block the amount of estrogen your body makes or to keep the estrogen from attaching to cancerous cells. They can use hormone therapy to treat a breast cancer that has recurred or to lower the risk of it coming back after surgery, radiation or other treatments.

Medications that combine estrogen with progestin or with other drugs are commonly used in uterine cancer. This is called combined or cyclic estrogen and progestin hormone therapy. During cyclic therapy, you take estrogen for 25 days each month and progestin for 3 to 5 days. During this time, you may have monthly bleeding.

Hormone therapy can help women who have gone through early or surgical menopause (primary ovarian insufficiency). These patients usually have very low levels of estrogen and may experience menopausal symptoms, such as hot flashes and vaginal dryness. Some doctors prescribe a combination of estrogen and testosterone for these women to improve sex drive and bone density and prevent osteoporosis.

Hormone therapy adds, blocks or removes hormones to slow cancer growth and prevent it from coming back (recurrence). It may be used alone as the main treatment or along with surgery, radiation and chemotherapy. It can be used before surgery to shrink the tumour and make it easier to remove or before radiation to reduce the risk of the cancer returning in the breasts or chest wall (local recurrence). It is also sometimes used for metastatic hormone-sensitive breast cancer that has spread to other parts of the body, especially the bones (distant recurrence).

The most common type of hormone therapy is taking drugs that block the body’s natural hormones. The drugs can be tablets you take by mouth or injections. They may be given by a doctor or nurse in a hospital clinic or at home.

Another type of hormone therapy is having surgery to remove the organs that make hormones. In women, this is usually the ovaries. In men, it is often the testicles. You can then take medicines to stop the ovaries from making hormones or have an operation to remove the prostate gland to stop it producing testosterone. Hormone therapy can also be combined with targeted therapy, which targets the specific chemicals that fuel cancer cells.

You will need to see your cancer doctor, called an oncologist, regularly while you are having hormone therapy. Your oncologist will ask about any side effects you have and can help control them.

Hormone therapy can cause side effects such as hot flushes, tiredness and changes in mood. It can also affect fertility for women and bring on early menopause for men. It can be hard to predict exactly how you will feel because it depends on the type of hormone therapy and how much you are taking.

For some types of hormone therapy, doctors may recommend that you start and then stop the medicine for a set amount of time. This is called intermittent dosing and can lower the risks of side effects without affecting the long-term outcome of the treatment. For example, if your PSA level is low and the doctor believes that the cancer has not come back, you may stop taking the hormone therapy drugs.

Hormones are chemicals that travel in the blood and control how some cells and organs act and grow. They can be produced by glands in the body or made in a lab.

The type of hormone therapy you get will affect what side effects you might have. Whether you have them and how severe they are depends on the type of treatment, how long you take it for and your gender.

For women, hormone therapy can cause menopausal symptoms like hot flashes and night sweats. It can also affect their vaginal function and change their menstrual cycle. It can also lead to osteoporosis, which causes bones to become thin and weak so they break more easily. It can also lower a woman’s libido and cause loss of or difficulty with an erection.

Some of these side effects may last after the treatment ends. Your doctor will help you watch for and manage these side effects. They might recommend a schedule of regular physical examinations and medical tests, called follow-up care.

If you have a hormone-sensitive cancer, your health care team may suggest that you take hormone therapy as part of your treatment plan. There are many types of hormone therapies used to treat different cancers. They can be taken alone or in combination with other treatments.

Some types of hormone therapies work by blocking or changing the way your body makes and uses certain hormones. This helps prevent them from boosting cancerous cell growth. For example, aromatase inhibitors (such as letrozole) block the enzyme that turns other hormones into estrogen. This can reduce estrogen levels and slow the growth of ER-positive breast cancers. Other types of hormone therapies include selective estrogen receptor modulators (SERMs) and estradiol.

Some of these medications can raise your risk for heart disease, stroke and blood clots. They can also increase your risk for endometrial cancer and gallbladder problems. You and your health care team should discuss these risks before you start hormone therapy.

Hormone therapy can reduce the risk of a cancer coming back after surgery and radiation, or of the cancer spreading to other parts of the body. These medicines stop or lower the amount of hormones that cause cancer cells to grow and divide, but they don’t work for every type of cancer.

Your doctor will decide whether or not hormone therapy is right for you. This will depend on your age, your health history and your symptoms. It also depends on the type of hormone therapy and how long you take it. The longer you take hormones, the more likely it is that they will increase your risk of blood clots, stroke or heart attack. It’s best to start hormone therapy at a young enough age that you won’t have these increased risks.

If you have a uterus, you can get hormone therapy by taking estrogen with progestin. This is called estrogen-progestin hormone therapy or EPT. If you have a hysterectomy, you can get systemic estrogen or ET without progestin.

Both types of hormone therapy have risks. They may increase your risk of endometrial cancer, which is a growth of tissue in the lining of the uterus that usually sheds during menstruation. They can also raise your risk of other diseases that affect the lining of the uterus, such as polycystic ovary syndrome (PCOS).

The types of medicine used in hormone therapy are called aromatase inhibitors and selective estrogen receptor modulators. They reduce the levels of certain estrogens in the body by blocking the enzyme that makes them. They can also help prevent cancerous cells from getting the boost from estrogen that they need to grow and spread.

Your doctor will give you a prescription for the amount of medicine you need to take. You can either get it at a pharmacy or have your doctor give you the medication at an office visit that is dedicated to hormone therapy. Your doctor will talk to you about how long you need to take hormone therapy and answer any questions you have.